This is broken down into two sections "Customer information"
and "Project Information":
Customer information is "Saved" as a file, you can recall
it later so all you have to do is enter in an Invoice Number and
the Project Name. Everything else is added for you. If you create
a new Customer account then You will have to first save that information,
but the program don't know that you want to use this customer for
your next Job, so to add them to the next job click on "Click
to add Customer Information to Project".
Each Customer can have their own Job Timer Settings. Setup Job
Timer like you would for this special customer. Then save the settings
file (prices.hpp) to your customers name. (ie: Customer.hpp). Once
you have saved your Job Timer settings then click on "Customer"
and Fill in this special customers name, address, phone etc. Click
on "Use Special Settings". Click the box next to it to
choose the settings you wish to use with this customer. (ie: Customer.hpp).
Save your customer information. Every time you use this customer
then your Job Timer settings will be changed to fit this customer.
By clicking "New" on the Main Control Panel all of your
Job Timer settings will be reverted back to the original setup.
(ie: Prices.hpp).
For example, I have a customer that gives me a lot of business
so therefore their prices are lower than all the other customers,
so I have set up a special customer settings for this customer.
Every time I set up a project for this customer their special settings
are used and I don't have to manually add in the new price set every
time, leaving the original price set intact for all the other customers
that I use.
"Auto" - When Checked will give you an automatic invoice
number.
"Chk" - When Checked will remind you to give your project
a Customer Name and or Invoice Number before you start any project.
The purpose of this function is that if you use the "Special
Customer Settings" and you add in your customer information
AFTER you have started the clock then your special customer
settings will not be used. So in order for those of us that
use special customer settings, it reminds us to put in our customer
information first before any time is added to the project.
"Include Invoice Number when Saving" - This will do as it says,
Clicking this will include the Invoice Number when you save your
project. Click on "Save As" and your invoice number will appear,
if you save your projects by your Invoice number like most do then
all you have to do is hit save without typing the invoice number.
If you do not want this feature then uncheck this check box and
it will save your projects just like it used to.
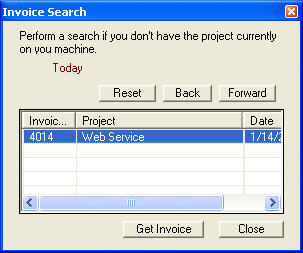
"Project Search" - On a network someone else has probably set
up the project and if this is the case then you can search for
this project if you know the project number, if you don't know
the project number then you can click on "Search" and this will
open the Invoice search window.

You can search for the project number by looking
for the project. Once you find the project that you would like
to work on then click on the project and click on "Get Invoice"
this will load the current project as long as the project hasn't
been closed. A invoice gets closed when someone has printed an
invoice which means that you can't continue using this invoice
and you will have to create a new invoice.
Because you're on a network and you try to put in
a invoice number that already exists then Job Timer 4 will not
allow you to create another invoice that is the same so you will
have to enter in another invoice number.
To make sure that you don't use the same invoice
number for another job click on "Auto" and this will assign a new
invoice to your project.
It's always a good idea to check to see if the project
already exists in the database before you create another one. This
way you don't end up with duplicate projects.
